
Create a Guidebook
Create a custom guidebook to curate your own set of content for users.
Overview
A guidebook is a collection of related topics and analyses that provide insight into business questions and workforce data.
Within the Guidebooks room, individual guidebooks appear as different sections.

Once you click into a guidebook, you will see a list of related topics. Topics are categories used to organize a collection of analyses. Each topic contains at least one analysis.

Topics
Use topics to group related analyses in a guidebook. For example, you can add the topic Diversity to all diversity-related analyses that you've created. When a user opens the Diversity topic, they'll see a list of analyses that have that topic, similar to a table of contents. This list-view is automatically generated by the platform when a topic is added to more than one analysis.

Topics also allow you to reuse analyses in another guidebook. For example, if you want to display the Women in Leadership analysis in the Organization guidebook, you can do so by adding a topic from the Organization guidebook to the analysis.
Note:
- The guidebooks that are curated by Visier experts are built using a 1:1 relationship, where each topic is added to a single analysis. We do this to bypass the list-view, reducing the number of clicks required for a user to reach the content.
- Guidebook topics will automatically be hidden when there is no data loaded for the content in the topic.
Custom guidebook workflow
As an administrator, you can create a custom guidebook to curate your own set of content for users. To ensure you have content for your guidebook, we recommend that you build your analyses first. For more information, see Create an Analysis in Projects.
Note: User created key groups are for individual use, so they won't appear when you're working in a project. To use your key groups for global content like Guidebooks, your administrator can re-create them as selection concepts in Studio. For more information, see Create a Selection Concept.
Once you have built your analyses, you can get them to appear in a custom guidebook by following these steps:
- Create a guidebook.
- Create topics in the guidebook.
- Add topics to your analyses.
Note: Can't see your guidebook or topic when previewing changes?
- Guidebooks will appear in the solution experience once it has a topic that has been added to an analysis.
- Topics will appear in the guidebook once it has been added to an analysis.
Create a guidebook
Create a new section in the Guidebooks room of the solution experience.
-
In a project, on the navigation bar, click Model > Guidebooks.
- Click Create Guidebook in the upper-right corner.
- In the Create Guidebook dialog, type a display name and description for the guidebook, and then click Create.
- Optional: Change the guidebook image:
- Click the Settings tab.
- Under Guidebook image, click Upload and select the image file on your computer.
Note:
- Images can be uploaded as a .gif, .png, or .jpg. The maximum file size is 5MB.
- For better compatibility, images should have a 4:3 aspect ratio.
- Images will also appear in the banner on the Topics list. For best results, any important elements should be in the vertical center of the image.
- Check out the Guidebook Images Library for a collection of images you can download and use for your custom guidebooks.
- Optional: Change the background color for the guidebook:
- Click the Settings tab.
- Type the color's hex value (for example, #a6ffff) in the Background Color box.
Note: This color will be used at 30% opacity as the background color of the guidebook image and the banner on the Topics list.
- Optional: Rearrange the order of the guidebooks:
- In the upper-right corner of the Guidebooks list, click Reorder.
- In the Display name column, click the Move button for the guidebook you want to move, and drag it to the desired position.
- When you are finished, click Save in the upper-right corner of the Guidebooks list.
Create topics in the guidebook
-
In a project, on the navigation bar, click Model > Guidebooks.
- In the Guidebooks list, select the guidebook you want to add topics to.
- In the Settings tab, click Create Topic in the upper-right corner of the Topics list.
- In the Create topic dialog, type a display name and description for the topic, and then click Create.
- To add an icon for the topic:
- In the Settings tab, select the topic you want to edit in the Topics list.
Result: The Side panel opens.
- In the Topic Icon area, click Upload and select the image file on your computer.
Note:
- Images can be uploaded as a .gif, .png, or .jpg. The maximum file size is 5MB.
- Check out the Topic Icons Library for a collection of icons you can download and use for your topics.
- In the Settings tab, select the topic you want to edit in the Topics list.
- Repeat steps 3 to 5 to add additional topics to the guidebook.
- Optional: Rearrange the order of the topics in the guidebook:
- In the upper-right corner of the Settings tab, click Reorder.
- In the Order column, click the Move button for the topic you want to move and drag it to the desired position.
- When you are finished, click Save.
Add topics to your analyses
Assign a topic to your analysis so it appears in your custom guidebook.
-
In a project, on the navigation bar, click Model > Analyses.
- In the Analyses list, select the analysis you want to add a topic to.
- In the Topics tab, click Add Topic in the upper-right corner.
-
In the Add topics dialog, select the topics you want the analysis to appear in, and then click Add.
The topics are organized by guidebook in the dialog.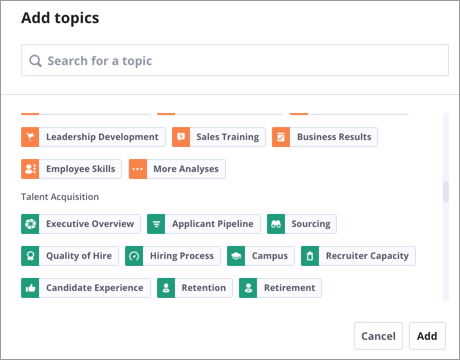
Result: Icons appear above the analysis title indicating the topics where the analysis appears.
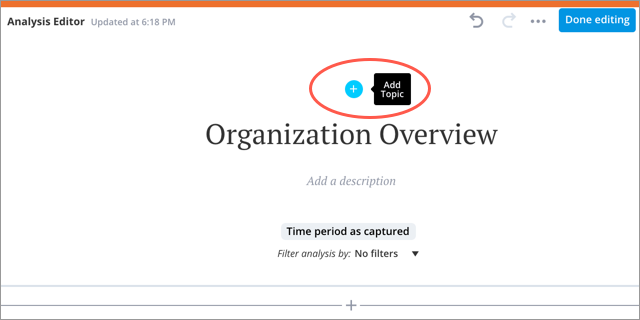
When working in a project, you can also add topics to an analysis from the Analysis Editor by clicking the Add topic button.
Note: If the analysis contains a description, a colon is automatically appended to the analysis title. The colon appears when you view the analysis in the Guidebooks room.